If you’ve spotted black speckles creeping across your bathroom ceiling, fuzzy patches behind the wardrobe, or that unmistakable musty smell in a south-facing bedroom — you’re dealing with one of the most common problems in Melbourne homes. And you’re far from alone.
After more than 15 years cleaning homes across Melbourne — over 500 of them — we can tell you with confidence: mould appears in some form in roughly half the homes we visit between May and September. It’s not a sign of a dirty home. It’s a sign of a Melbourne winter doing what Melbourne winters do.
The good news: most household mould can be removed safely and effectively, and almost all of it can be prevented from coming back. The bad news: the most common removal method Australians use — bleach — often makes the problem worse.
This guide covers everything we’ve learned from a decade and a half of dealing with mould in real Melbourne homes: what actually kills it, how to remove it from every surface safely, why it keeps returning, and the honest line between a DIY job and one that needs professional equipment.
Why Melbourne Homes Are a Perfect Storm for Mould
Mould needs three things to grow: moisture, organic material to feed on (plaster, timber, dust, soap residue), and still air. Melbourne delivers all three for roughly five months every year.
Winter humidity and condensation. From May to September, the gap between cold outdoor air and heated indoor air creates constant condensation — on single-glazed windows, on cold south-facing walls, inside wardrobes against external walls, and on bathroom ceilings. Every drop of that condensation is drinking water for mould.
Melbourne’s housing stock. A large share of Melbourne homes were built before modern ventilation standards. Weatherboard homes with poor subfloor ventilation, brick veneer homes with uninsulated south walls, apartments with internal bathrooms and no window, and older homes with original single-glazed windows all create cold surfaces where moisture condenses daily.
Winter habits. Drying clothes on racks indoors, long hot showers with the fan off, kettles and cooking without the rangehood running, and keeping windows sealed shut for warmth — each adds litres of water vapour to indoor air every single day. A single load of washing dried indoors releases up to 5 litres of moisture into your home.
Less sunlight, less airflow. South-facing rooms in Melbourne receive minimal direct winter sun. Combined with closed windows, the still, damp, dark conditions in these rooms are exactly what mould colonies need to establish.
From our own cleaning records: the rooms where we most frequently find mould in Melbourne homes are, in order — bathroom ceilings and silicone seals, bedroom windows and sills, wardrobe interiors against external walls, laundry walls, and ceiling corners in south-facing rooms.
What You’re Actually Looking At: Types of Household Mould
You don’t need to identify the exact species to remove household mould safely, but it helps to understand what you’re dealing with.
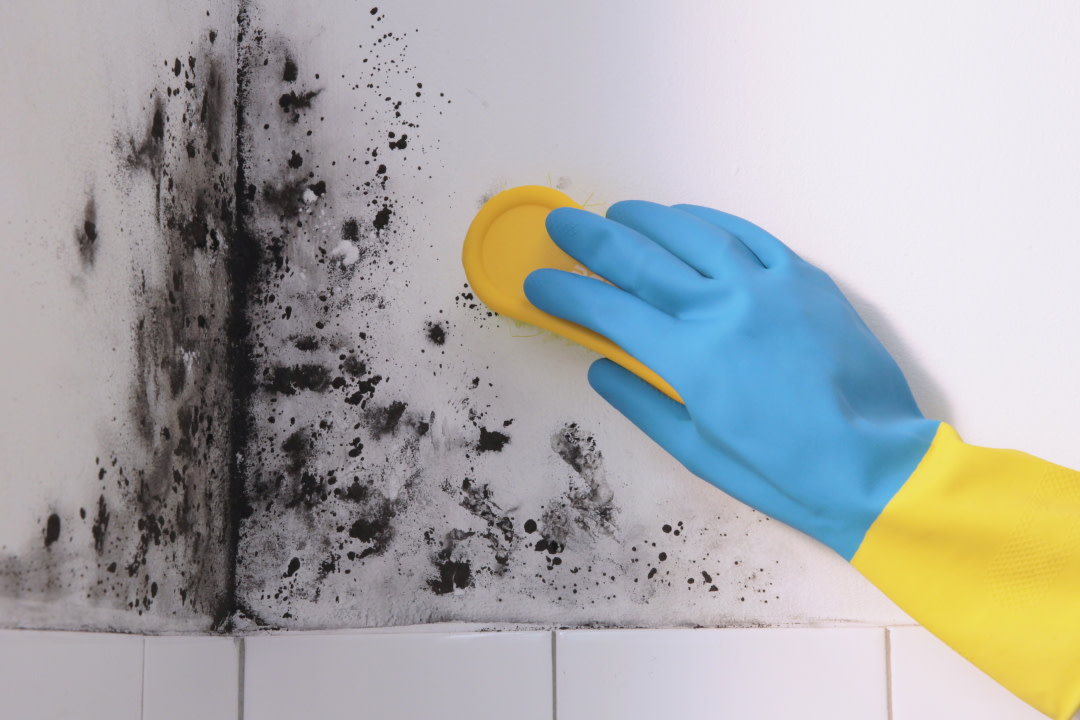
Surface mould (most common). The speckled black, grey, or green growth on bathroom ceilings, grout, silicone, and window frames. This is what most Melbourne homeowners encounter, and it’s generally removable with the right cleaning approach.
“Black mould”. The term usually refers to Stachybotrys, which grows on chronically wet porous materials — plasterboard that’s been soaked by a leak, carpet underlay after flooding, timber behind a leaking shower. If you have dense, dark, slimy growth on plasterboard or timber that’s been wet for weeks, this is beyond DIY cleaning — the material usually needs professional assessment and often replacement.
Mildew. The flat, powdery white-grey growth on fabrics, leather, and damp surfaces. Easier to remove than established mould, but a warning sign of the same moisture problem.
The critical distinction isn’t the species — it’s the surface. Mould on non-porous surfaces (tiles, glass, painted metal) sits on top and wipes away. Mould on porous surfaces (plasterboard, timber, grout, carpet, fabric) grows roots into the material — and this is where most DIY removal goes wrong.
Health Considerations: The Honest Version
We’re cleaners, not doctors, so we’ll keep this factual and measured.
Mould releases spores that can trigger allergic reactions in sensitive people — sneezing, itchy eyes, congestion, and skin irritation. For people with asthma, mould exposure is a recognised trigger that can worsen symptoms. People with weakened immune systems, chronic lung conditions, the very young, and the elderly are generally more sensitive to mould exposure.
For most healthy adults, the small patches of bathroom mould common in Melbourne homes are not a health emergency — but they’re not nothing either, and they always indicate a moisture problem that will keep growing if ignored.
If anyone in your household has unexplained, persistent respiratory symptoms that improve when they leave the house, mention the mould to your GP. And if you’re dealing with extensive mould (more than a square metre, or spread across multiple rooms), prioritise fixing it rather than living with it.
When we clean homes for clients with asthma or allergies, we always use HEPA-filter vacuums — standard vacuums pass mould spores straight through the bag and blow them back into the room air. It’s one of the most common mistakes we see in DIY mould cleanup.
The 1-Square-Metre Rule: DIY or Professional?
Before any removal steps, apply this simple rule used across the cleaning and remediation industry:
DIY is appropriate when:
- The total mould area is smaller than about 1 square metre
- It’s growing on non-porous or semi-porous surfaces (tiles, glass, painted walls, silicone, grout)
- The moisture source is obvious and fixable (condensation, shower steam, a dryer venting indoors)
- No one in the household is highly sensitive to mould
Call a professional when:
- The affected area is larger than 1 square metre, or appears in multiple rooms
- Mould is growing on or inside porous materials — plasterboard, carpet, underlay, insulation, structural timber
- The mould returns within weeks every time you clean it
- There’s a hidden moisture source — a roof leak, plumbing leak, or rising damp
- You can smell mould but can’t find it (it may be inside a wall cavity or under flooring)
- Anyone in the home has significant respiratory conditions
For perspective on professional costs in 2026: professional mould cleaning for a single room typically ranges from $500 to $1,000 in Australia, with the average job around $390 and rates near $63 per hour. Severe remediation involving material removal runs significantly higher. Catching mould early — or preventing it entirely — is dramatically cheaper than remediation.
What Actually Kills Mould (And Why Bleach Usually Fails)
This is the single most important section of this guide, because almost everyone gets it wrong.
The bleach myth. Household bleach is a surface whitener and disinfectant — but on porous surfaces like grout, plaster, and timber, the water in bleach soaks into the material while the chlorine stays on the surface. The result: the visible mould loses its colour (so it looks gone), the roots survive inside the material, and the added moisture actually feeds regrowth. This is why bleached mould patches reliably return within weeks — something we see constantly in homes we’re called to.
Bleach has a place on hard, non-porous surfaces like glazed tiles. But as an all-purpose mould killer, it’s the wrong tool.
What works instead:
White vinegar (80% vinegar, 20% water). Plain white vinegar penetrates porous surfaces and kills most common household mould species at the root. It’s cheap, low-toxicity, safe around children and pets once dry, and it’s the first-line treatment we recommend for walls, ceilings, grout, and silicone. The smell dissipates within a day.
Oxygen bleach / hydrogen peroxide (3%). Effective on grout and harder surfaces, with a whitening effect that vinegar lacks. Useful as a second-stage treatment on stained grout after vinegar has done the killing.
Specialist mould removers. Commercial mould treatment products (look for ones that state they kill mould roots, not just “remove mould stains”) are worth using for stubborn or recurring patches. Avoid products that are essentially repackaged bleach.
Never mix products. Bleach mixed with vinegar or ammonia produces toxic gases. Use one product at a time, rinse between if switching, and ventilate while working.
Step-by-Step: How to Remove Mould from Every Surface
Gear up first: rubber gloves, a P2 mask (a few dollars from any hardware store — worth it to avoid breathing disturbed spores), old clothes, and microfibre cloths you’re willing to throw away afterwards. Open the window, close the door to the rest of the house, and never dry-brush mould — it launches spores into the air.
Walls and Ceilings (Painted Plasterboard)
- Fill a spray bottle with 4 parts white vinegar to 1 part water
- Spray the mouldy area generously and leave it for a full hour — this is the step people skip, and it’s the one that kills the roots
- Wipe with a damp microfibre cloth, working from the outside of the patch inward
- Re-spray lightly with vinegar and leave it to dry without rinsing — the residue keeps working
- Dispose of the cloths; don’t wash and reuse them
- For ceiling mould, use a flat mop or a cloth on a broom head rather than working overhead on a ladder with dripping spray
From our experience: if paint is bubbling, flaking, or the plasterboard feels soft or spongy under the mould, moisture has penetrated the board itself. Surface cleaning won’t fix this — the board is wet from behind, usually from a roof or plumbing leak, and needs investigation before any cosmetic fix.
Bathroom Ceilings
Same vinegar method, but with two additions. First, after the mould is removed and the ceiling fully dry, consider repainting with an anti-mould bathroom paint — standard ceiling paint in a Melbourne bathroom without good extraction will re-mould within one winter. Second, fix the cause: run the exhaust fan during every shower and for 20 minutes afterwards. If your bathroom has no fan or a weak one, this is the single best investment you can make against bathroom mould.
Tile Grout
- Spray vinegar generously along the grout lines and wait an hour
- Scrub with a stiff grout brush or an old toothbrush
- For remaining staining, make a paste of bicarbonate of soda and a little water, scrub again, and rinse
- For white grout that stays stained, follow with 3% hydrogen peroxide as a whitening stage
- Once fully dry, sealing the grout with a grout sealer dramatically slows future mould growth
Silicone Seals (Shower and Window)
Honest answer from 15 years of cleaning: once mould has penetrated inside silicone — visible as black staining within the seal rather than on its surface — no cleaning product fully removes it. Surface mould on silicone responds to the vinegar treatment. Embedded staining means the silicone needs cutting out and replacing, which is a cheap, straightforward job for a handyperson. Apply mould-resistant silicone and the problem won’t return for years.
Window Frames and Sills
Melbourne’s winter condensation makes this the second most common mould location we see. Spray vinegar, wait, wipe, and dry thoroughly. Then manage the cause: wipe condensation from windows each winter morning (a window squeegee makes this a 60-second job), and open bedroom windows for 10 minutes daily to flush out humid air — yes, even in July.
Wardrobes and Cupboards Against External Walls
Empty the wardrobe, treat the walls with the vinegar method, and let everything dry completely before refilling. Then prevent recurrence: pull the wardrobe 5cm away from the external wall to allow airflow, don’t pack it wall-to-wall tight with clothes, and place a moisture absorber inside during winter. Mouldy-smelling clothes should be washed in the hottest water their care label allows, with a cup of vinegar in the wash.
Carpet and Soft Furnishings
Small surface mildew on carpet can be treated by vacuuming with a HEPA vacuum (never a standard one), then sponging with vinegar solution and drying fast with fans and ventilation. But carpet that’s been wet — from flooding, a leak, or chronic damp — almost always has mould in the underlay where no surface treatment reaches. Professional hot-water extraction can address surface-level contamination; soaked underlay generally needs replacement. If your carpet smells musty after drying, the underlay is the problem.
Stopping It Coming Back: Melbourne Winter Prevention
Removal without prevention is a subscription to repeat the job every winter. These are the habits and fixes that actually keep Melbourne homes mould-free — drawn from what we see working in the 500+ homes we service.
Ventilate daily, even in winter. Ten minutes of open windows each morning replaces humid indoor air with dry outdoor air. It feels counterintuitive when it’s 8 degrees outside, but cold air holds far less moisture — letting it in and reheating it produces drier indoor conditions.
Run extraction at the source. Exhaust fan during and 20 minutes after every shower. Rangehood whenever you cook. Laundry door closed and window open when the dryer runs — or better, vent the dryer outside.
Rethink indoor clothes drying. This is the biggest hidden moisture source in Melbourne winters. If you must dry indoors, do it in one closed room with a window cracked open, or use a dehumidifier alongside the rack.
Use moisture absorbers in problem zones. Wardrobes, ensuites without windows, caravan-style laundry nooks. The disposable tub-style absorbers cost a few dollars and visibly collect the water that would otherwise feed mould.
Consider a dehumidifier for chronic rooms. For south-facing bedrooms or homes with persistent condensation, a dehumidifier holding indoor humidity below 60% removes mould’s primary requirement. We’ve seen this single change end multi-year mould battles in older weatherboard homes.
Let sunlight and air reach problem areas. Open wardrobe doors occasionally, pull furniture slightly off external walls, open blinds in south rooms during the day. Mould hates light and moving air.
Maintain the outside. Clear gutters (overflowing gutters soak walls), trim vegetation touching external walls, and check that subfloor vents around the base of older homes aren’t blocked by soil or garden beds — blocked subfloor ventilation is a classic cause of musty smells and floor-level mould in Melbourne’s older housing stock.
Renters and Landlords: Who’s Responsible for Mould in Victoria?
This comes up constantly in homes we clean, so here’s the practical picture.
Under Victoria’s rental minimum standards, rental properties must be free from mould and damp caused by or related to the building structure. In plain terms: if mould results from a leaking roof, rising damp, broken exhaust fan, or structural defects, that’s the rental provider’s responsibility to fix. If mould results from how the property is lived in — never ventilating, drying washing indoors daily with windows sealed — responsibility shifts toward the renter.
In practice, most situations involve both, which is why documentation matters. If you’re renting and dealing with mould: photograph it with dates, report it to your property manager in writing, and keep ventilating in the meantime. If it’s structural and unresolved, Consumer Affairs Victoria and VCAT are the escalation paths.
If you’re a landlord or property manager: addressing moisture sources promptly is far cheaper than remediation, repainting, and vacancy periods — and mould complaints are among the most common reasons rentals end up in dispute.
When to Call in Professional Help
A realistic summary of where professional cleaning fits into the mould picture:
A professional deep clean makes sense when mould has spread across multiple surfaces, when you want every affected area treated correctly in one visit (walls, grout, silicone, ceilings, window tracks), when someone in the home is sensitive to spores and the cleanup needs HEPA filtration and proper containment, or when you simply want it done thoroughly without spending your weekend in a P2 mask.
Our deep cleaning service covers full mould surface treatment as part of a whole-home reset, and our anti-viral sanitisation adds hospital-grade disinfection of treated surfaces. For carpets with musty odours or surface mildew, professional steam carpet cleaning with hot-water extraction reaches contamination that household machines can’t. And for homes where mould keeps winning because cleaning keeps slipping, a regular house cleaning schedule keeps bathrooms, windows, and problem zones maintained before mould establishes.
Specialist remediation (beyond any cleaning company) is needed when mould is inside wall cavities, under floors, in HVAC ducting, or growing through soaked plasterboard and insulation. That’s structural remediation work involving containment and material replacement — and any honest cleaning company will tell you when your problem has crossed that line. We do, and we’ll point you in the right direction if your situation needs it.
📞 Want a professional assessment of a mould-affected home? Call Himaya on 0449 626 424 — honest advice on whether it’s a cleaning job, a prevention job, or a remediation job.
Top 10 Frequently Asked Questions
1. What kills mould permanently?
Nothing kills mould “permanently” while moisture remains — removing the moisture source is the only permanent fix. For removal, white vinegar (80/20 with water) kills most household mould at the root on porous surfaces. Combine root-killing treatment with moisture control (ventilation, extraction fans, dehumidification) and mould stays gone.
2. Is vinegar or bleach better for mould?
Vinegar. Bleach only removes the colour from mould on porous surfaces like grout and plasterboard — the roots survive and regrow, and bleach’s water content feeds them. Vinegar penetrates porous materials and kills the mould structure itself. Reserve bleach for hard non-porous surfaces only.
3. Why does my Melbourne home get mould every winter?
Melbourne winters combine cold external surfaces, heated humid indoor air, sealed windows, and indoor clothes drying — producing daily condensation on windows, south-facing walls, and bathroom ceilings. That repeated moisture is what feeds annual mould growth. Daily ventilation and extraction fans break the cycle.
4. Can I remove black mould myself?
If it’s surface growth smaller than about one square metre on non-porous or painted surfaces, yes — with gloves, a P2 mask, and the vinegar method. If it’s dense growth on chronically wet plasterboard, carpet, or timber, or it covers more than a square metre, it needs professional assessment. Wet porous materials usually require replacement, not cleaning.
5. How much does professional mould removal cost in Melbourne?
In 2026, professional mould cleaning averages around $63 per hour, with typical single-room jobs between $500 and $1,000 and average overall jobs around $390. Full remediation involving plasterboard or carpet replacement costs significantly more. Surface mould treated early costs a fraction of established contamination.
6. Is mould in the bedroom dangerous?
Mould spores can trigger allergies and aggravate asthma, and bedrooms matter more because of the hours spent there. Small window-sill patches should be treated promptly but aren’t an emergency for most healthy people. Persistent respiratory symptoms that improve away from home are worth raising with your GP.
7. How do I stop condensation on my windows in winter?
Reduce indoor moisture (lids on pots, exhaust fans, no unvented indoor clothes drying), ventilate 10 minutes daily, and squeegee window condensation each morning. For chronic cases, a dehumidifier keeping humidity below 60% largely eliminates window condensation in Melbourne winters.
8. Does mould come back after cleaning?
Only if the moisture returns. Mould cleaned with root-killing treatment (vinegar or specialist products) and kept dry will not regrow. Mould cleaned with bleach, or cleaned without fixing the moisture source, almost always returns within weeks — this is the most common pattern we see in Melbourne homes.
9. Can mould grow inside walls without being visible?
Yes. A persistent musty smell with no visible mould often indicates growth inside a wall cavity, under flooring, or behind furniture — usually fed by a plumbing leak, roof leak, or rising damp. This needs professional investigation, as hidden mould can’t be treated from the surface.
10. Should I use a dehumidifier for mould in Melbourne?
For chronic problem rooms — south-facing bedrooms, internal bathrooms, older homes with persistent condensation — yes. Keeping indoor humidity below 60% removes the moisture mould needs. A dehumidifier is most effective combined with daily ventilation and source extraction, not as a substitute for them.
Mould in a Melbourne home isn’t a failure of housekeeping — it’s physics. Cold surfaces, warm humid air, and five months of closed windows will grow mould in any home that doesn’t actively manage moisture.
The formula that works: kill it properly (vinegar, not bleach), fix the moisture source, and ventilate daily through winter. Do those three things and the annual mould battle most Melbourne households accept as normal simply stops.
And if the job is bigger than a spray bottle and a Saturday morning — or you’d rather it handled professionally with HEPA filtration, proper treatment of every surface, and honest advice about anything beyond cleaning — we’ve been doing exactly that across Melbourne for more than 15 years.
📞 Call Himaya: 0449 626 424 🌐 Free quote: mommybearcleaning.com.au/contact-us
Mommy Bear Cleaning Services | 13 Brittanica St, Officer VIC 3809 | 10% off your first clean