Mommy Bear Cleaning Services | Officer, Victoria 3809
The project at a glance
Detail
Information
Project type
Post-renovation cleaning before property sale
Location
Beaconsfield–Emerald Rd, Guys Hill (near Beaconsfield, VIC)
Condition
Heavy construction dust, paint splatter, builders’ residue throughout
Scope
Whole-house deep clean — bathrooms, kitchen, living areas, windows, floors, cabinetry
Purpose
Preparing the property for real estate photography and sale
There’s a moment after the builders leave when you walk through your newly renovated home and feel two things at once.
The first is excitement. The new tiles are in. The cabinetry looks sharp. The layout finally works the way you always imagined.
The second is dread. Because every surface — every window, every drawer, every square centimetre of floor — is covered in a fine layer of construction dust, paint splatter, silicone smears, and builders’ debris that makes the whole place look like it’s still mid-project.
That’s exactly the situation we walked into on a recent renovation cleaning project near Beaconsfield. The homeowners had completed a significant renovation and needed the property cleaned to a presentable standard before real estate photography and sale. The renovation work was done, but the house was nowhere near liveable — let alone ready to be photographed and listed.
This is the kind of work we do regularly across Officer, Pakenham, Beaconsfield, Berwick and Melbourne’s south-east. And it’s the kind of work that genuinely shows the difference between a professional renovation clean and someone trying to do it with a household vacuum and a damp cloth.
Here’s what we found, what we did, and what the finished result looked like.
What the home looked like when we arrived
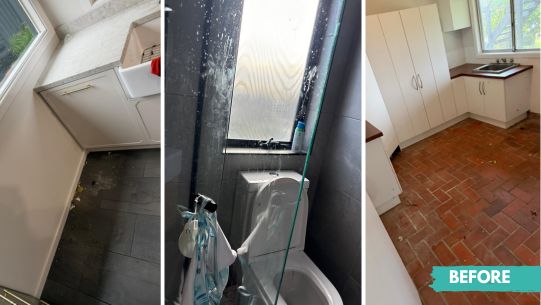
The renovation had involved work across the entire property — bathrooms, kitchen, living areas, flooring, and windows. The construction itself was finished, but no post-build cleaning had been done.
The bathroom was one of the worst-affected areas. New dark grey wall tiles had been installed, and the tiling work was complete — but the window glass was heavily covered in paint splatter and dried construction dust. White residue from grout and plaster dust coated the window frame and surrounding tile surfaces. The toilet and fixtures had a visible film of fine dust, and there was builders’ debris around the base of the fittings. The shower glass still had protective film residue and construction marks.
The kitchen had new white cabinetry installed, but the drawers and cabinet interiors were full of sawdust, plaster dust, and small debris left behind by the builders. The herringbone-pattern brick flooring — a distinctive feature of the home — was dulled by a layer of fine dust and grit that had been ground into the surface over weeks of foot traffic during the build. The stainless steel sink and benchtops had a coating of construction film.
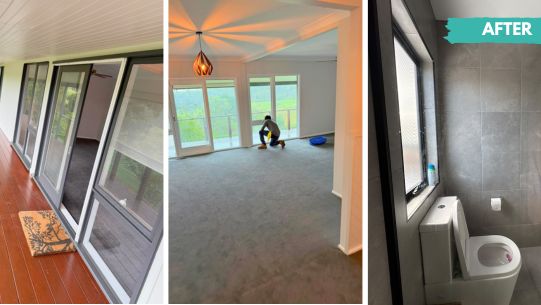
The living areas had carpet and timber flooring that had accumulated construction dust throughout the renovation period. The large sliding glass doors and window panels were smeared with handprints, adhesive residue, and dust. Window tracks were packed with grit and debris.
The laundry had dirty grey tile floors with scattered debris, and the white cabinetry was marked with dust and construction residue.
Throughout the house, the same pattern repeated: the renovation work itself was well executed, but the property needed a thorough, professional-grade clean before it could be photographed, let alone presented to buyers.
Why this type of cleaning can’t be done with household products
Renovation dust isn’t like regular household dust.
Regular dust is mostly skin cells, fabric fibres, and outdoor particles. It sits on surfaces and can be wiped or vacuumed up without much difficulty.
Construction dust is different. It contains silica from concrete, cement, and plaster. It includes calcium carbonate from drywall. It often includes timber particles, adhesive residue, paint overspray, grout haze, and fine glass particles from cutting and grinding.
This matters for two reasons:
First, it’s a health hazard. Fine silica dust — the kind produced by cutting tiles, grinding concrete, and sanding plaster — is classified as a respiratory risk by Safe Work Australia. It penetrates deep into the lungs and can cause serious long-term health problems with prolonged exposure. Walking through a post-renovation home and stirring up settled dust without proper equipment puts you and your family at risk.
Second, it damages surfaces if cleaned incorrectly. Fine construction grit acts like sandpaper when you wipe it across glass, benchtops, or finished floors with a dry cloth. Using a standard household vacuum without a HEPA filter simply redistributes the finest particles back into the air. And using the wrong cleaning products on new tiles, sealed timber, or freshly painted surfaces can strip finishes before they’ve had a chance to cure properly.
This is why we use commercial-grade HEPA-filtered vacuums, microfibre cloths designed for fine particle capture, and cleaning solutions matched to each surface type. It’s not about working harder — it’s about using the right equipment for the specific challenge that construction dust presents.
How we cleaned the property — room by room
Every renovation clean follows a systematic approach. We work from the top of the house down, from the dirtiest areas to the cleanest, and we treat each surface type individually based on what it needs.
Here’s how this particular project unfolded.
Dust extraction — the first pass
Before touching any surface with a cloth or mop, we completed a full dust extraction pass through the entire property.
This means vacuuming every surface — floors, window sills, door frames, light fittings, skirting boards, cabinetry tops, and built-in shelves — using commercial HEPA-filtered vacuum equipment that captures particles down to 0.3 microns. A standard household vacuum lets fine construction dust straight through its filter and back into the air.
This initial pass is critical. If you start wiping or mopping before extracting the loose dust, you simply push grit across surfaces and create scratches. In the living area of this property, our team member worked methodically through the carpeted rooms with professional equipment, extracting the settled dust that had accumulated during the weeks of renovation work.
The dust extraction alone transformed the air quality in the home. Walking through the property after this first pass, the difference was immediately noticeable — the haze that had been hanging in the rooms was gone.
Bathroom transformation
The bathroom required the most intensive work on this project. The new dark grey tiles were finished and grouted, but every surface had a layer of construction residue.
Window glass: The paint splatter visible on the bathroom window was removed using a combination of careful scraping with a professional glass blade (held at the correct angle to avoid scratching) and a cleaning solution that dissolves paint without damaging glass or surrounding silicone seals. This is one area where DIY attempts commonly go wrong — using a razor blade at the wrong angle, or applying too much pressure, permanently scratches glass.
Tiles and grout: New tiles often have a film of grout haze — a thin, cloudy residue left after grouting. This requires a specific grout haze remover applied with a non-abrasive pad. Using acidic household products on new grout can etch the grout lines and damage the tile surface.
Toilet and fixtures: Fine dust had settled on every fixture surface. Each piece was wiped, sanitised, and polished. The area around the base of the toilet was cleared of builders’ debris and cleaned thoroughly.
Shower glass: Any protective film residue was removed, and the glass was cleaned to a streak-free finish.
The finished bathroom — with its clean dark tiles, clear window glass, and spotless fixtures — looked like a completely different room from the one we walked into that morning.
Kitchen deep clean
The kitchen presented a different set of challenges. The white cabinetry was new, which meant the surfaces were clean underneath the construction dust — but every drawer and cupboard interior had accumulated sawdust, plaster particles, and small debris.
Cabinet interiors: Every drawer was pulled out and vacuumed. The drawer bases, runners, and interior walls were wiped with damp microfibre cloths to capture fine particles. You’d be surprised how much dust collects inside brand-new cabinets when they’re installed during an active renovation. Tiny particles settle in the corners and along the runners — exactly where your cutlery, plates, and food will go.
Benchtops and sink: The stainless steel sink and benchtop surfaces were degreased, wiped, and polished. Construction adhesive marks and tape residue were carefully removed.
Herringbone brick floor: This was one of the most distinctive features of the home — and one of the most labour-intensive surfaces to clean. The textured brick surface had trapped fine grit in every crevice and joint. We vacuumed first, then mopped with a solution appropriate for sealed brick, working the product into the herringbone pattern to lift the embedded construction dust. The floor came up noticeably cleaner and the natural colour of the brickwork was restored.
Living areas and flooring
The living areas had both carpet and timber flooring that needed different approaches.
Carpet: Thoroughly vacuumed using commercial equipment to extract embedded construction dust from the carpet fibres. Surface-level vacuuming isn’t sufficient after a renovation — the fine particles settle deep into the pile and require multiple slow passes with a high-suction machine.
Timber flooring: The polished timber floors near the sliding glass doors were dust-mopped first to prevent scratching, then cleaned with a timber-safe solution that lifts residue without stripping the finish. The result was a clean, glossy surface that showed off the timber’s natural warmth.
Windows and glass
The sliding glass doors and window panels throughout the property needed extensive attention. Construction dust adheres to glass through static charge and moisture, and it was clear these surfaces hadn’t been cleaned at any point during the renovation.
Window glass: Cleaned inside and out with professional glass cleaning solution and lint-free cloths. The large sliding doors in the living area were particularly important — they frame the property’s views of the surrounding greenery and are one of the first things a buyer notices.
Window tracks and frames: Packed with grit, dead insects, and construction debris. We vacuumed the tracks first, then scrubbed with a detail brush and wiped clean. Clean window tracks are a detail that real estate agents and property inspectors notice immediately.
Sliding door runners: Cleaned and checked for smooth operation. Grit in the runners can cause doors to stick and tracks to wear prematurely.
Laundry
The laundry area had grey tile floors with scattered debris and marks on the white cabinetry. We cleaned the floor tiles, wiped down all cabinet surfaces, cleaned the sink and tap fittings, and ensured the space was ready for use.
The finished result
The transformation across the property was significant. Every room went from visibly post-construction to genuinely move-in ready.
The bathroom — which had been the worst-affected area — looked immaculate. Clean grey tiles, clear window glass with no trace of paint splatter, spotless fixtures, and a space that presented exactly as the renovation intended.
The kitchen cabinetry was clean inside and out. The herringbone brick floor showed its character again. The living areas had clean carpet and polished timber, and the large sliding glass doors were crystal clear, framing the property’s leafy outlook.
The property was photographed for sale shortly after our clean. That’s the reason this project mattered — the homeowner wasn’t just cleaning up after a renovation. They were preparing a property for market, which means every detail counts. Buyers make judgements within seconds of walking through a door, and a home that still has visible construction dust, smeared windows, and gritty floors sends entirely the wrong message.
After the project was completed, we received a five-star Google review from a family member of the homeowner:
“Great job cleaning my parents house after renovations being done and prior to sale pictures being taken. They’ve also done a few cleans on my house and I’m very happy with the results.” — James Coustley, Google Review
That kind of feedback is what drives our work. When a client brings us back for their own home after seeing what we did for their parents, that tells us the result spoke for itself.
Common DIY mistakes with renovation cleaning
We see the aftermath of DIY renovation cleaning attempts regularly. Here are the most common issues:
Wiping surfaces before vacuuming. This grinds fine grit across glass, benchtops, and finished surfaces, creating micro-scratches that are visible in direct light.
Using household vacuums without HEPA filters. Standard vacuum filters can’t capture construction-grade fine dust. The particles pass straight through and recirculate into the air — you’re essentially redistributing the dust around the house.
Using vinegar or acidic cleaners on new grout. Fresh grout needs time to cure. Acidic products dissolve the surface layer, weakening the grout and creating a porous surface that stains easily.
Scraping paint off glass with the wrong technique. Using a blade at the wrong angle, or on dry glass, scratches the surface permanently. Professional glass cleaning requires the correct blade angle, adequate lubrication, and steady pressure.
Mopping timber floors with too much water. Excess moisture seeps into joints and edges, causing timber to swell and warp. Post-renovation timber cleaning requires a damp (not wet) microfibre mop and a product that doesn’t leave residue.
Ignoring cabinet interiors. Construction dust settles inside every drawer and cupboard. Moving in and filling your kitchen cabinets with plates and food without cleaning the interiors first means your belongings sit directly on plaster dust and sawdust.
Health risks from construction dust that most homeowners overlook
This isn’t an area where we want to overstate things — but it’s worth understanding what construction dust actually contains.
According to Safe Work Australia, respirable crystalline silica (RCS) — found in concrete, tiles, bricks, and engineered stone — is one of the most significant occupational health hazards in the construction industry. While the greatest risk is during active cutting and grinding, settled silica dust that gets disturbed during cleaning still poses a respiratory risk, particularly for children, elderly people, and anyone with existing respiratory conditions such as asthma.
Fine construction dust also commonly contains:
Calcium carbonate and calcium sulphate from plasterboard and joint compound
Wood particles from timber cutting and sanding
Adhesive and sealant vapour residue
Paint overspray particles
Fibreglass or mineral wool fibres from insulation work
A professional renovation clean using HEPA-filtered equipment removes these particles from the home environment. A DIY clean with standard household equipment often just moves them around.
What we cleaned — full project checklist
Here’s the complete scope of work for this renovation cleaning project:
Throughout the property:
Full dust extraction with commercial HEPA-filtered vacuum — all floors, surfaces, sills, frames, and fittings
Skirting boards wiped
Door frames and handles cleaned
Light switches and power points wiped
Cobweb removal from ceiling corners and light fittings
Bathroom:
Wall tiles cleaned and grout haze removed
Window glass — paint splatter removed, cleaned to streak-free finish
Toilet cleaned and sanitised inside and out
Shower glass cleaned, protective film residue removed
Fixtures polished
Floor tiles vacuumed and mopped
Builders’ debris removed
Kitchen:
All cabinet interiors vacuumed and wiped
Drawer runners cleaned
Benchtops cleaned and polished
Stainless steel sink cleaned
Splashback wiped
Herringbone brick floor vacuumed and mopped
Adhesive and tape residue removed from surfaces
Living areas:
Carpet vacuumed with commercial equipment (multiple passes)
Timber flooring dust-mopped and cleaned
Sliding glass doors cleaned inside and out
Window tracks vacuumed, scrubbed, and wiped
Sliding door runners cleared of grit
Laundry:
Floor tiles cleaned
Cabinet surfaces wiped
Sink and tap fittings cleaned
Windows (whole house):
Internal glass cleaned
External glass cleaned (accessible areas)
Frames and sills wiped
Tracks cleaned
Why professional renovation cleaning saves time and reduces stress
Most homeowners underestimate how long a post-renovation clean takes.
A three-bedroom house after a moderate renovation typically requires 8–16 hours of professional cleaning time, depending on the extent of the work. That’s with commercial equipment, trained cleaners, and efficient systems.
Attempting the same job as a DIY project — with a household vacuum, supermarket cleaning products, and no experience with construction dust — usually takes two to three times longer and produces a noticeably inferior result.
For homeowners in Officer, Pakenham, Berwick, Clyde North and surrounding suburbs who are preparing a property for sale after renovation, the cost of professional cleaning is negligible compared to the impact on how the property photographs and presents.
Factor
DIY renovation clean
Professional renovation clean
Equipment
Household vacuum (no HEPA), cloths, mop
Commercial HEPA vacuum, microfibre systems, professional solutions
Time for 3-bed home
20–30+ hours over multiple days
8–16 hours in a single visit
Fine dust removal
Partial — recirculates through standard filters
Captured down to 0.3 microns
Paint splatter removal
Risk of glass scratching
Professional blade technique
Grout haze
Often makes it worse with wrong products
Correct remover for tile and grout type
Cabinet interiors
Often forgotten
Systematically cleaned
Window tracks
Usually skipped
Vacuumed, scrubbed, detailed
Result
Visually improved but dust resettles within days
Move-in or sale-ready presentation
Practical tips if you’re planning a renovation
If you’re about to start or are currently mid-renovation on a property in Cardinia, Beaconsfield, or anywhere across Melbourne’s south-east, these steps will make your post-renovation clean easier and less expensive:
Ask your builder to do a rough clean before leaving. Most building contracts include a “builders’ clean” — a basic sweep and removal of large debris. Make sure this happens before you engage a professional cleaning team.
Keep doors to unaffected rooms closed during the build. Construction dust migrates through open doorways and HVAC systems. Sealing off rooms that aren’t being worked on reduces the overall cleaning scope.
Don’t move furniture or belongings in until after the clean. This seems obvious, but we’ve arrived at properties where the homeowner has already moved clothes into wardrobes and food into kitchen cupboards — all sitting on layers of construction dust.
Book your renovation clean before scheduling photography or inspections. If you’re selling, allow at least 48 hours between the clean and the photographer. This gives time for any residual airborne dust to settle and be removed.
Let new paint and grout cure before cleaning. Most interior paints need 2–4 weeks to fully cure. Grout needs at least 48–72 hours. Cleaning too early can damage finishes. Let your cleaners know what’s new so they can adjust their products accordingly.
Why homeowners across Officer and Melbourne’s south-east choose Mommy Bear Cleaning for renovation projects
We’re a family-owned cleaning business based in Officer, VIC 3809. We’ve built our reputation on the kind of work you’ve seen in this article — real projects, real results, documented and reviewed by real clients.
Renovation cleaning is one of our core services because it requires exactly what we’re good at: systematic, thorough, detail-oriented work using professional equipment and products matched to each surface type.
We service renovation cleaning projects across Officer, Pakenham, Beaconsfield, Berwick, Clyde North, Cardinia, and Melbourne’s broader south-east region.
Whether your renovation is a bathroom refresh, a full kitchen rebuild, or a complete home transformation like the project featured in this article, we have the equipment, the team, and the experience to get the property to a standard that’s ready for living in — or ready for the market.
Book your renovation clean
If you’ve just finished a renovation, or your builders are about to wrap up, now is the time to book your post-renovation clean.
Contact Mommy Bear Cleaning to discuss your project:
We’ll assess the scope, provide a transparent quote, and schedule the clean around your timeline — whether that’s before a real estate photographer arrives, before your tenants move in, or before your family comes home.
Your renovation deserves a finish that matches the effort that went into it.
Frequently Asked Questions
1. What is renovation cleaning?
Renovation cleaning (also called post-renovation cleaning, after-builders cleaning, or construction cleaning) is a specialised deep clean performed after building, renovation, or construction work is completed. It removes construction dust, paint splatter, grout haze, adhesive residue, and builders’ debris from all surfaces throughout the property.
2. How is renovation cleaning different from regular house cleaning?
Regular house cleaning deals with everyday dust, dirt, and grime. Renovation cleaning addresses construction-specific contaminants — fine silica dust, plaster particles, paint overspray, grout residue, silicone smears, adhesive marks, and sawdust. It requires commercial HEPA-filtered vacuums, specialised cleaning products, and knowledge of how to safely clean newly installed surfaces without causing damage.
3. How long does a post-renovation clean take?
For a standard three-bedroom home after a moderate renovation, expect 8–16 hours of professional cleaning time. Extensive renovations involving multiple rooms, heavy dust, and paint splatter may require a full day or longer. The scope depends on the extent of the construction work and how much builders’ cleaning was done before handover.
4. How much does renovation cleaning cost?
Pricing depends on the property size, the extent of renovation work, and the condition of the property. A professional renovation clean typically costs more than a standard deep clean because of the specialised equipment required and the intensity of the work. Contact us for a quote based on your specific project.
5. Can I do renovation cleaning myself?
You can attempt it, but the results are typically inferior to professional cleaning. Household vacuums lack HEPA filters, which means fine construction dust gets recirculated into the air. Incorrect cleaning products can damage new tiles, grout, timber, and painted surfaces. Professional cleaners have the equipment and knowledge to handle construction-specific contaminants safely and effectively.
6. Is construction dust dangerous?
Yes. Fine construction dust can contain respirable crystalline silica (RCS), which is a known respiratory health hazard according to Safe Work Australia. It also commonly contains plaster particles, wood dust, fibreglass fibres, and adhesive residue. Children, elderly people, and those with asthma or respiratory conditions are particularly vulnerable. Professional HEPA-filtered vacuuming removes these particles rather than redistributing them.
7. When should I book a renovation clean?
Book your renovation clean after all construction work is complete and the builders have done their rough clean (removing large debris and sweeping). Ideally, book the professional clean before moving furniture or belongings into the property, and at least 48 hours before any real estate photography or inspections.
8. Do you clean inside new cabinets and drawers?
Yes. Construction dust settles inside every cabinet and drawer during a renovation. We remove all drawers, vacuum the interiors, wipe down runners and surfaces with microfibre cloths, and ensure every storage space is clean before you put anything inside.
9. Can you remove paint splatter from windows and glass?
Yes. We use professional glass blades at the correct angle with appropriate lubrication to remove paint splatter without scratching the glass. This is one of the most common areas where DIY attempts cause permanent damage — incorrect blade angle or dry scraping scratches glass surfaces.
10. Do you clean window tracks after renovation?
Yes. Window tracks and sliding door runners accumulate significant amounts of grit, dust, and debris during construction. We vacuum, scrub, and wipe all tracks as part of our renovation cleaning service. Clean tracks also ensure smooth window and door operation.
11. What areas do you service for renovation cleaning?
We’re based in Officer, VIC 3809 and service renovation cleaning projects across Pakenham, Beaconsfield, Berwick, Clyde North, Cardinia, Guys Hill, Emerald, Upper Beaconsfield, Narre Warren, Cranbourne, Hallam, Dandenong, and Melbourne’s broader south-east region.
12. Can renovation cleaning be done before selling a property?
Absolutely. The project featured in this article was specifically a post-renovation clean before real estate photography and property sale. A professional renovation clean ensures the property photographs beautifully and presents at its best for inspections and open homes.
13. What equipment do you use for renovation cleaning?
We use commercial-grade HEPA-filtered vacuums (capturing particles down to 0.3 microns), professional microfibre cleaning systems, grout haze removers, glass cleaning blades, timber-safe floor cleaning solutions, and eco-friendly sanitising products. The equipment is matched to each surface type to avoid damage.
14. Do you offer renovation cleaning for commercial properties?
Yes. We service both residential and commercial post-renovation cleaning projects. Commercial fitouts, office refurbishments, and retail renovations all generate construction dust that requires professional removal before the space can be occupied.
15. How soon after the renovation clean can I move in?
In most cases, the property is move-in ready immediately after the clean. We recommend allowing any residual airborne particles to settle for 24 hours if the renovation was particularly dusty, then doing a quick surface wipe before unpacking.
16. What’s the difference between a builders’ clean and a professional renovation clean?
A builders’ clean is typically a rough clean done by the construction team — removing large debris, sweeping floors, and a basic wipe-down. It’s included in most building contracts but doesn’t address fine dust, paint splatter, grout haze, cabinet interiors, window tracks, or detailed surface cleaning. A professional renovation clean picks up where the builders’ clean leaves off and brings the property to a liveable or sale-ready standard.